In the beginning

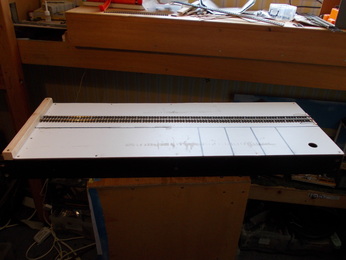
It all began with the baseboard, of course. In this case it is actually two boards. They are designed to box together for transport, with the track and scenery inside the box, out of harm's way. Here the trackage is being planned out using bits of track, string and card templates. I find this works much better than trying to draw up scale drawings. A few items of stock are already partially assembled.
A few months later
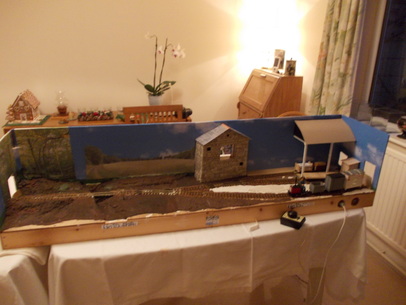
What with one thing and another, no more photographs were taken for several months, during which there was much progress. The track was laid and ballasted, much of the backscene was put up, the landscape formed from polystyrene, plaster and clay, the stone barn built (more on that later) and a start made on the Dutch barn, not to mention a lot more progress with the rolling stock.
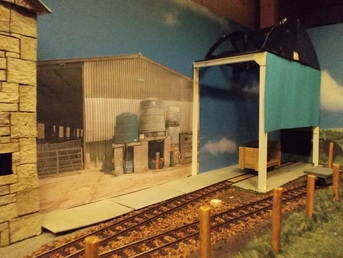
The main sky backscene is a commercial offering, but the overlays are done using my own photographs.
That thing the line crosses on the left of the picture is not a ditch or stream, it is a cattle stop, popularly known as a 'ha-ha'. In this context it allows trains to enter and leave the field without having to stop to open and shut a gate. The cows cannot jump up over the retaining wall or walk across the open-framed bridge, so are kept in the field while the trains, which can cross the bridge, pass freely.
The beginnings of a wood
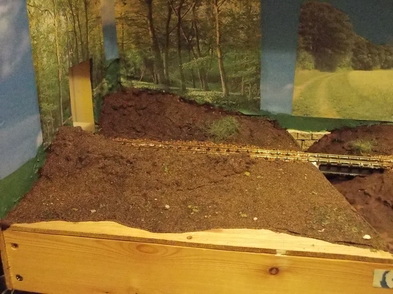
After a lot of work with PVA glue and dark earth scatter, I managed to make some convincing bare earthy ground as a basis for the woodland floor. Crossing the cattle stop, trains will enter a woodland area and disappear among the trees. I like the way that the bank on the model appears to be continued into the backscene. The cattle stop bridge is simplicity itself, just a couple of plastruct girders glued onto the sleeper webbing of the flexitrack.
The fiddle yard
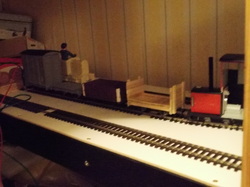
A fiddle yard was not part of the original plan but I eventually decided that the trains needed to go somewhere. The fiddle yard is a single board that fits between the frames of the right-hand scenic board for transport and storage. All part of the ethos of making it all as portable as possible.
The very neat two-tone finish is due to the board being constructed from a few reject furniture components from ikea!
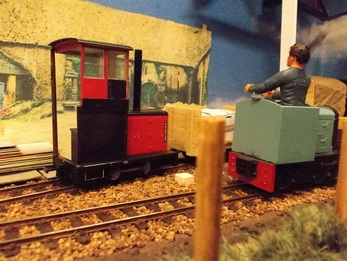
The yard is just long enough to hold a 4-wheel diesel with five standard length wagons and a 4-wheel brakevan.
The very neat two-tone finish is due to the board being constructed from a few reject furniture components from ikea!
The yard is just long enough to hold a 4-wheel diesel with five standard length wagons and a 4-wheel brakevan.
Let the grass grow
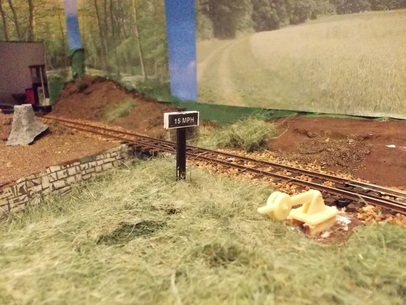
The grass is hanging basket liner, glued down as a mat and then torn up vertical once dry. It makes very realistic 'gruffy' rough bad grass but is no good for succulent pastures. It looks better in real life than in this photo.
The speed sign was made from a few bits of plasticard with the signboard made up using Microsoft Word text box formatting and printed on paper. The speed limits follow Sir Arthur Heywood's dictum that the speed of trains should be equal to the number of inches in the track gauge.
The (working) point lever and tree stumps are resin castings by Sidelines.
A closer look at the barn
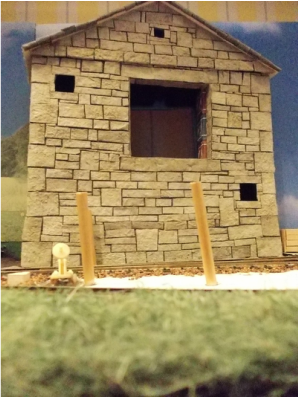
I must admit to being very pleased indeed with the stone barn. It is a triumph of true improvisational scratchbuilding. My only qualm is that the stones are perhaps a bit on the hefty side.
The basis for the whole barn is a shoebox with various bits relocated and reinforced with scraps of wood. The stonework is all pieces of egg box glued on after the carcase was painted grey. The back of the barn is a sheet of plasticard.
The roof is actually separate so that it can be removed to box the boards together (the other board protrudes into the upper space). It has bits of plastic sheet, shoebox, video cassette, dice box, toy packaging, business cards and photo frame. The roof tiles (not visible here) are a Scalescenes printout installed inlayers on strips of card to give the proper tile relief.
The floor in the upper level of the barn (not visible here) is made from slats of venetian blind. I am building a crane to lower boxes of farm produce from the barn into the railway wagons, hence the hole in the backscene wherewith to introduce the boxes.
The whole barn is very robust indeed, yet is not excessively heavy.
Please shut the gate

I made a gate out of bits of venetian blind slat. It is mounted on a rod next to the post which sticks down through a hole in the baseboard. Turning the rod opens and shuts the gate. Having to open and shut the gate adds a whole extra element to operation.
More grass has been planted and the right-hand end backscene fitted. I like the way the track sweeps and curves through the grass.
The white brick marks the fouling point where the two lines meet.
The fence posts are pieces of wooden rod.
More grass has been planted and the right-hand end backscene fitted. I like the way the track sweeps and curves through the grass.
The white brick marks the fouling point where the two lines meet.
The fence posts are pieces of wooden rod.
Hedges and fillers
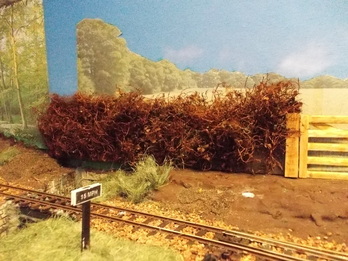
It took a while to find the best materials for making a hedgerow to divide the grazing field through which the railway passes from the crop field on the backscene. In the end I decided on using pieces of dried groundcover plants glued to a card backing and covered with leaves. The leaves have yet to be added. The gateposts were make of wood scraps with the gate made up with strips of wood cut from an old venetian blind slat.
The farmyard takes shape
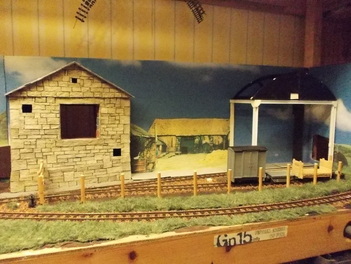
I rebuilt the Dutch barn so the model now represents one end of it rather than a corner. It just seems to look better this way and makes more sense somehow.
The farmyard itself is on the backscene of course. It is a photo from the internet that has been flipped over, cropped, resized, clone stamped and colour altered. It has turned out too yellow, so I will have to alter the colour balance again and print off another.
With most of the grass planted, the area in front of the fence is looking like a field, but still needs some more work.
And then there were two
At last I took the opportunity of having several days free to do some serious finishing off and make a few important changes. The rail ends at the ends of the main line on the scenic section were re-laid flush with the board end on secure mountings so that neighbouring boards such as the fiddle yard could be properly connected (Originally it was intended to have no fiddle yard and the holes in the sky to let trains go off-scene were an afterthought - the rail ends had been flush with the backscene board).
The fiddle yard was completely re-laid with just one straight track as it was found even with limited testing that additional unpowered tracks for stock storage were unnecessary and it was better to just sit stock on the baseboard surface when at rest. The remaining track was straightened up (it originally had a point leading to a very short curve to allow the fiddle yard to join on at either end) as I decided that the added complexity was not worth it. So now the fiddle yard can only attach at the left hand end. If I want a right-hand yard it would be simpler to build a second yard
The fiddle yard was completely re-laid with just one straight track as it was found even with limited testing that additional unpowered tracks for stock storage were unnecessary and it was better to just sit stock on the baseboard surface when at rest. The remaining track was straightened up (it originally had a point leading to a very short curve to allow the fiddle yard to join on at either end) as I decided that the added complexity was not worth it. So now the fiddle yard can only attach at the left hand end. If I want a right-hand yard it would be simpler to build a second yard
for that end. Finalising the trackage allowed me to finish the wiring, so now the whole layout runs as originally intended, and two locomotives can be accommodated in a limited way. I had a session of two-loco running to test this capability. Now the major task ahead was to develop the scenery.
Paper and sticks are most versatile
I decided to change the farmyard backscene as the original I felt was not in keeping with the scene. The stone was the wrong colour and the gravel yard clashed with the concrete surface in front. So I made a new one by taking my camera with me when I went to work at the farm, and took several pictures especially for backscene use. With some minor modifications, a shot of the end gable of the main barn proved best. I was unsure about having all three visible buildings pointing in roughly the same direction, but I have seen it done here and there, so there is a precedent.
I began work on the corrugated iron sheeting for the barn, trying Tetra-Pak, thin card, the shiny layer stripped off of Tetra-Pak card, and thick paper, the last proving best. I originally tried making scale sized sheets of CI and putting them together, thinking that seeing the joints was vital, but on observation of the real thing I noticed that, on well-fitted, well-maintained CI at least, the joints are not at all obvious and would be better simulated merely by scribing and shading. So it is simple sheets of packaging
I began work on the corrugated iron sheeting for the barn, trying Tetra-Pak, thin card, the shiny layer stripped off of Tetra-Pak card, and thick paper, the last proving best. I originally tried making scale sized sheets of CI and putting them together, thinking that seeing the joints was vital, but on observation of the real thing I noticed that, on well-fitted, well-maintained CI at least, the joints are not at all obvious and would be better simulated merely by scribing and shading. So it is simple sheets of packaging
paper run through a scrapbooking crimper for the barn, with one-piece sides that will be given an impression of individual sheets in the painting and finishing stage.
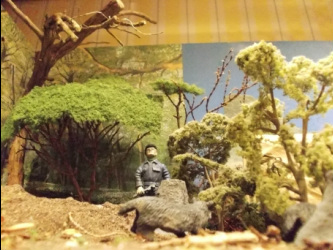
At the other end, I got to work on changing the woods from some brown ground with a couple of tree stumps and a woodland background into a proper corner of the woods. A few bush cuttings from the garden were dried, stripped of leaves and cut to shape to use as tree armatures. The big tree is made from pieces of rosemary bush while the small ones are Hebe twigs. The foliage is not the final finish and is just there to give an idea of what the trees should look like with leaves on. The top of the big tree detaches and is transported separately to allow the other board to rest on the supporting column which is covered by the main trunk of the tree.
A pair of old 00 ready-made trees have become saplings rising among the stumps following coppicing, and a couple of Schleich badgers added. They were actually marketed as badger cubs, the firm's adult badgers are about 1/6th scale as they make all their animals to be the same sort of size, fortunately there is little apparent difference between young and mature badgers. The man is standing on the track and only there to give scale to the picture.
I still need another tree to go on the rise fronting the embankment, and may choose to try a commercially made 'G-scale' tree.
