Locos
No.5 Open cab 0-4-0DM
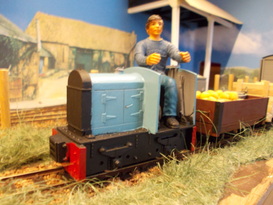
The first IC loco on the railway, built by Brumley Engineering in the thirties and still going well.
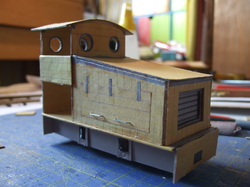
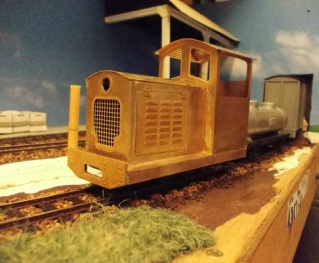
This is a Sidelines Hornet kit on a Black Beetle motor bogie built as per instructions. My first loco in Gn15.
The photo here is the most recent available and will be replaced as work on the loco progresses.
This is a Sidelines Hornet kit on a Black Beetle motor bogie built as per instructions. My first loco in Gn15.
The photo here is the most recent available and will be replaced as work on the loco progresses.
No.6 Closed cab 0-4-0DM with timber 'garden shed' bodywork
The second IC loco on the railway, part of the plan to eliminate steam in order to remain a viable transport system against increasingly cheap and convenient road transport. Chassis and engine assembly built by Brumley Engineering, but as this was during the depression, the firm folded before they could make the bodywork and so the estate carpenters made a timber body for it.
This was my second Gn15 loco, an experiment in budget construction. It was built using the printy kit of R&ER ICL No.1 that came free in an old copy of the Gn15 Tome, backed onto scrap card (the backs of old notepads), sat on a very cheap second hand Hornby Smokey Joe chassis. Since this photo was taken, the cab has been substantially improved and more detailing added but at present it is in storage. The chassis proved to be just too unreliable, even with added weight, and since I made the body to fit it, it is difficult to find a suitable replacement, especially one that will allow me to put a foot well in the cab (it is so low that the driver's knees would be level with his/her chest in the present arrangement).
This was my second Gn15 loco, an experiment in budget construction. It was built using the printy kit of R&ER ICL No.1 that came free in an old copy of the Gn15 Tome, backed onto scrap card (the backs of old notepads), sat on a very cheap second hand Hornby Smokey Joe chassis. Since this photo was taken, the cab has been substantially improved and more detailing added but at present it is in storage. The chassis proved to be just too unreliable, even with added weight, and since I made the body to fit it, it is difficult to find a suitable replacement, especially one that will allow me to put a foot well in the cab (it is so low that the driver's knees would be level with his/her chest in the present arrangement).
No.7 Closed cab 0-6-0DM
Originally built by Hunslet after the war to work on a seaside passenger line. That line closed in the sixties when the resort went downhill with the increase in foreign holidays, and all the equipment was bought cheap for use on the Estate. It underwent re-fitting to optimise it for heavy freight hauling rather than fast passenger runs and has become the loco of choice for big trainloads.
This is a Minimum Gauge Models Classic Style diesel body kit on a Bachmann BR 04 chassis (the old enclosed sandwich block type with split-frame pickup) built as per instructions. With its excellent looks and good running it looks set to be the pride of the line.
The photo here is the most recent available and will be replaced as work on the loco progresses.
No.8 Convertible cab 0-4-0DM
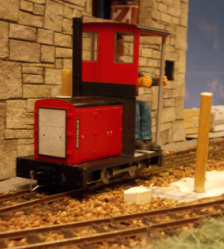
Built 1980 by Alan Keef Ltd as a replacement for No.6 which was suffering heavily from a lack of long-obsolete spare parts, it is best at hauling short fast freights such as the morning milk train.
This is a Bachmann 0n30 Davenport shunter with a rebuilt cab. The cab top is secured by the black 'lip' and can be lifted off to give it an open cab.
The photo here is the most recent available and will be replaced as work on the loco progresses.
This is a Bachmann 0n30 Davenport shunter with a rebuilt cab. The cab top is secured by the black 'lip' and can be lifted off to give it an open cab.
The photo here is the most recent available and will be replaced as work on the loco progresses.
Rolling Stock
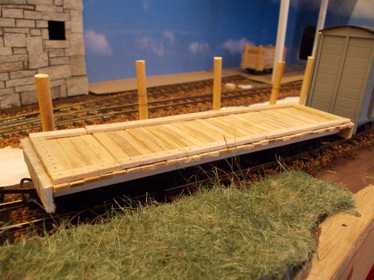
Coffee stirrers and old 00 chassis make brilliant budget wagons
Here is a simple recipe which should work for other scales too:
Ingredients:
1. Some old 00 wagons or coaches.
2. Lots of coffee stirrers or stripwood (depending on how you like your planks).
3. Some balsa or other thicker sheet wood (for buffer beams).
Utensils:
1. Craft knives and cutting mat.
2. A steel ruler.
3. A sharp pencil.
4. A bottle of PVA glue or model aeroplane glue.
5. A razor saw (if using a donor with a screw-on body).
6. Sandpaper may be helpful.
That's all you need, really.
Method:
1. Remove body from wagon or coach and remove and carefully store wheelsets.
2. Saw off any protrusions on the top of the chassis (such as screw columns) to leave a flat top on the chassis. Cut off the couplings if you don't want to use tension-locks. Cut off any bits that will be inappropriate or underscale for the finished model.
3. Decide how wide your wagon will be and cut lots of stirrers/stripwood to that length for the deck planks.
4. Glue the deck onto the chassis top plank-by-plank, making sure all planks stick out equally on either side, each plank is at 90 degrees to the chassis top ends and all the plank ends line up. Make the end plank sides flush with the ends of the chassis top. Note that here I am describing transverse planking. If you want longitudinal planking you will have to devise your own method.
5. Leave the wagon to dry. This is important.
6. Cut out bufferbeams from the balsa sheet and mount them on each end, with the topsides flush with the deck, the ends flush with the deck sides, and the undersides high enough to clear couplings and track.
7. Cut two stirrers to length for the solebars and glue in place over the 00 solebars. On a bogie vehicle, do this for the chassis frames instead.
You now have a basic flat wagon. If you want to just have a flat wagon, just fit retaining strips around the deck (to stop the load falling off) and its almost finished - skip to detailing section below.
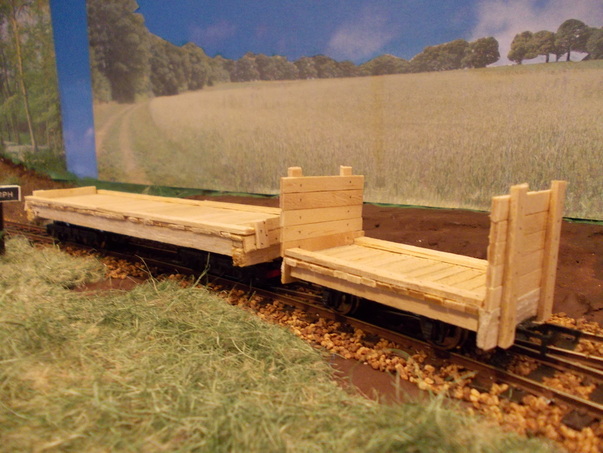
If you want bulkhead ends:
8. Decide how high the bulkhead ends will be.
9. Cut four stirrers to the length of height of ends plus height of bufferbeam. These will be the uprights.
10. Cut planks for the ends to the same length as the deck planks.
11. Secure the uprights to the worksurface in their pairs at their planned distance apart.
12. Glue the planks onto the uprights, starting at the same distance from the bottom as the height of the bufferbeams, and work up to the top in a similar manner to step 4.
13. Leave the ends to dry.
14. Free the ends from the worksurface and mount on the wagon ends after the manner of the smaller wagon below.
15. Fit retaining strips along the sides of the deck.
I have not yet tried fitting sides to these wagons.
Detailing is a simple matter of prodding the wagon with the pencil in the right places to leave grey dots representing bolt/screw heads.
Then weather to taste and serve on a layout.
Ingredients:
1. Some old 00 wagons or coaches.
2. Lots of coffee stirrers or stripwood (depending on how you like your planks).
3. Some balsa or other thicker sheet wood (for buffer beams).
Utensils:
1. Craft knives and cutting mat.
2. A steel ruler.
3. A sharp pencil.
4. A bottle of PVA glue or model aeroplane glue.
5. A razor saw (if using a donor with a screw-on body).
6. Sandpaper may be helpful.
That's all you need, really.
Method:
1. Remove body from wagon or coach and remove and carefully store wheelsets.
2. Saw off any protrusions on the top of the chassis (such as screw columns) to leave a flat top on the chassis. Cut off the couplings if you don't want to use tension-locks. Cut off any bits that will be inappropriate or underscale for the finished model.
3. Decide how wide your wagon will be and cut lots of stirrers/stripwood to that length for the deck planks.
4. Glue the deck onto the chassis top plank-by-plank, making sure all planks stick out equally on either side, each plank is at 90 degrees to the chassis top ends and all the plank ends line up. Make the end plank sides flush with the ends of the chassis top. Note that here I am describing transverse planking. If you want longitudinal planking you will have to devise your own method.
5. Leave the wagon to dry. This is important.
6. Cut out bufferbeams from the balsa sheet and mount them on each end, with the topsides flush with the deck, the ends flush with the deck sides, and the undersides high enough to clear couplings and track.
7. Cut two stirrers to length for the solebars and glue in place over the 00 solebars. On a bogie vehicle, do this for the chassis frames instead.
You now have a basic flat wagon. If you want to just have a flat wagon, just fit retaining strips around the deck (to stop the load falling off) and its almost finished - skip to detailing section below.
If you want bulkhead ends:
8. Decide how high the bulkhead ends will be.
9. Cut four stirrers to the length of height of ends plus height of bufferbeam. These will be the uprights.
10. Cut planks for the ends to the same length as the deck planks.
11. Secure the uprights to the worksurface in their pairs at their planned distance apart.
12. Glue the planks onto the uprights, starting at the same distance from the bottom as the height of the bufferbeams, and work up to the top in a similar manner to step 4.
13. Leave the ends to dry.
14. Free the ends from the worksurface and mount on the wagon ends after the manner of the smaller wagon below.
15. Fit retaining strips along the sides of the deck.
I have not yet tried fitting sides to these wagons.
Detailing is a simple matter of prodding the wagon with the pencil in the right places to leave grey dots representing bolt/screw heads.
Then weather to taste and serve on a layout.
Other Wagons
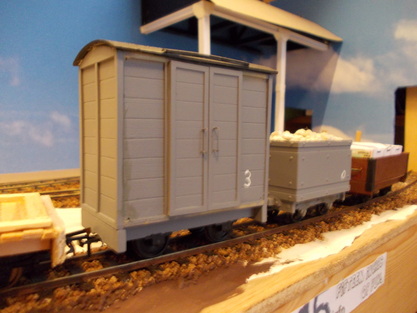
Yes, I do build wagon kits too. Here are a couple of Sidelines kit builds, the SL501 van (does not come with rain strips, couplings or door handles) and the SL006 'mining' tub wagon, both built as per instructions.
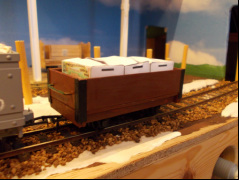
This is the first item I ever built in Gn15, years ago now, a freelance Top type wagon built on an old Grafar 00 (yes, that old) wagon chassis using 20, 40 and 60 thou plasticard (I always use those grades), following the floor and bodywork dimensions for the standard Heywood (Eaton Hall) Top wagon published in Mark Smithers's famous volume on the work of the minimum gauge founder. The top is, like the real thing, removable (with care).
